¿Qué es ArqPlano?
ArqPlano es un editor de planos arquitectónicos 2D y 3D que funciona directamente en tu navegador, sin necesidad de instalar nada ni crear una cuenta. Podés diseñar el plano de tu casa, departamento o local, ver el resultado en tres dimensiones en tiempo real y exportar el resultado como imagen para compartirlo con tu arquitecto, contratista o familia.
A diferencia de los software de arquitectura profesionales — que requieren días de aprendizaje, licencias costosas y equipos potentes —, ArqPlano está pensado para que cualquier persona pueda crear un plano funcional y comunicativo en menos de una hora. Si querés visualizar cómo quedaría una reforma, verificar si los muebles caben en una habitación, o simplemente tener una idea clara antes de hablar con un profesional, ArqPlano es la herramienta correcta.
Funciona en computadoras de escritorio, laptops y tablets. Para una experiencia óptima se recomienda una pantalla de al menos 10 pulgadas. El plano se guarda automáticamente en el navegador — no necesitás crear una cuenta ni conectarte a internet después de cargar la aplicación.
Crear tu Primer Plano: Paso a Paso
Crear un plano completo desde cero puede hacerse en minutos si seguís este orden. La clave es empezar siempre por el perímetro exterior y construir desde afuera hacia adentro.
-
Abrí ArqPlano en tu navegador
Ingresá a arqplano.com. La aplicación carga automáticamente y muestra un plano de ejemplo con algunas habitaciones. Podés trabajar sobre ese ejemplo modificándolo, o empezar desde cero usando el botón "Nuevo Plano" en la barra superior. Si es tu primera vez, te recomendamos explorar el plano de ejemplo para familiarizarte con la interfaz antes de borrarlo.
-
Seleccioná la herramienta de paredes
En la barra de herramientas de la izquierda, hacé clic en el ícono de lápiz (herramienta de paredes). El cursor cambiará para indicar que estás en modo dibujo. Vas a ver también que en el panel lateral derecho aparecen las opciones de la pared: grosor, altura y color.
-
Dibujá tu primera pared
Hacé clic en el canvas para establecer el punto de inicio de la pared. Arrastrá el cursor hacia donde querés que llegue la pared. Mientras arrastrás, la aplicación muestra la medida exacta en metros. Hacé clic nuevamente para fijar el punto final y la pared queda dibujada. El snap de grilla se activa automáticamente: cada movimiento se alinea a 25 cm, garantizando medidas prolijas.
-
Cerrá el perímetro de la habitación
Continuá dibujando paredes desde el punto final de la anterior. Cuando te acercás al punto de inicio de la primera pared, la aplicación lo detecta y se produce el snap de cierre automático — el recinto queda cerrado como un polígono. Un recinto cerrado es necesario para que el piso se pinte y para que la vista 3D genere el volumen correctamente.
-
Agregá paredes interiores
Una vez cerrado el perímetro exterior, dibujá las paredes que dividen los ambientes interiores. Las paredes interiores se apoyan sobre las exteriores: hacé clic sobre una pared existente para iniciar una nueva pared desde ese punto. El snap detectará automáticamente el punto de contacto.
-
Ajustá el grosor de las paredes
Hacé clic sobre cualquier pared para seleccionarla. En el panel lateral derecho aparecerá el control de grosor. El valor por defecto es 15 cm — ideal para paredes interiores. Para paredes exteriores, se recomienda 20 a 25 cm. Para tabiques livianos de baño o plaquería, 10 cm es suficiente. Podés editar el grosor escribiendo el valor directamente en el campo.
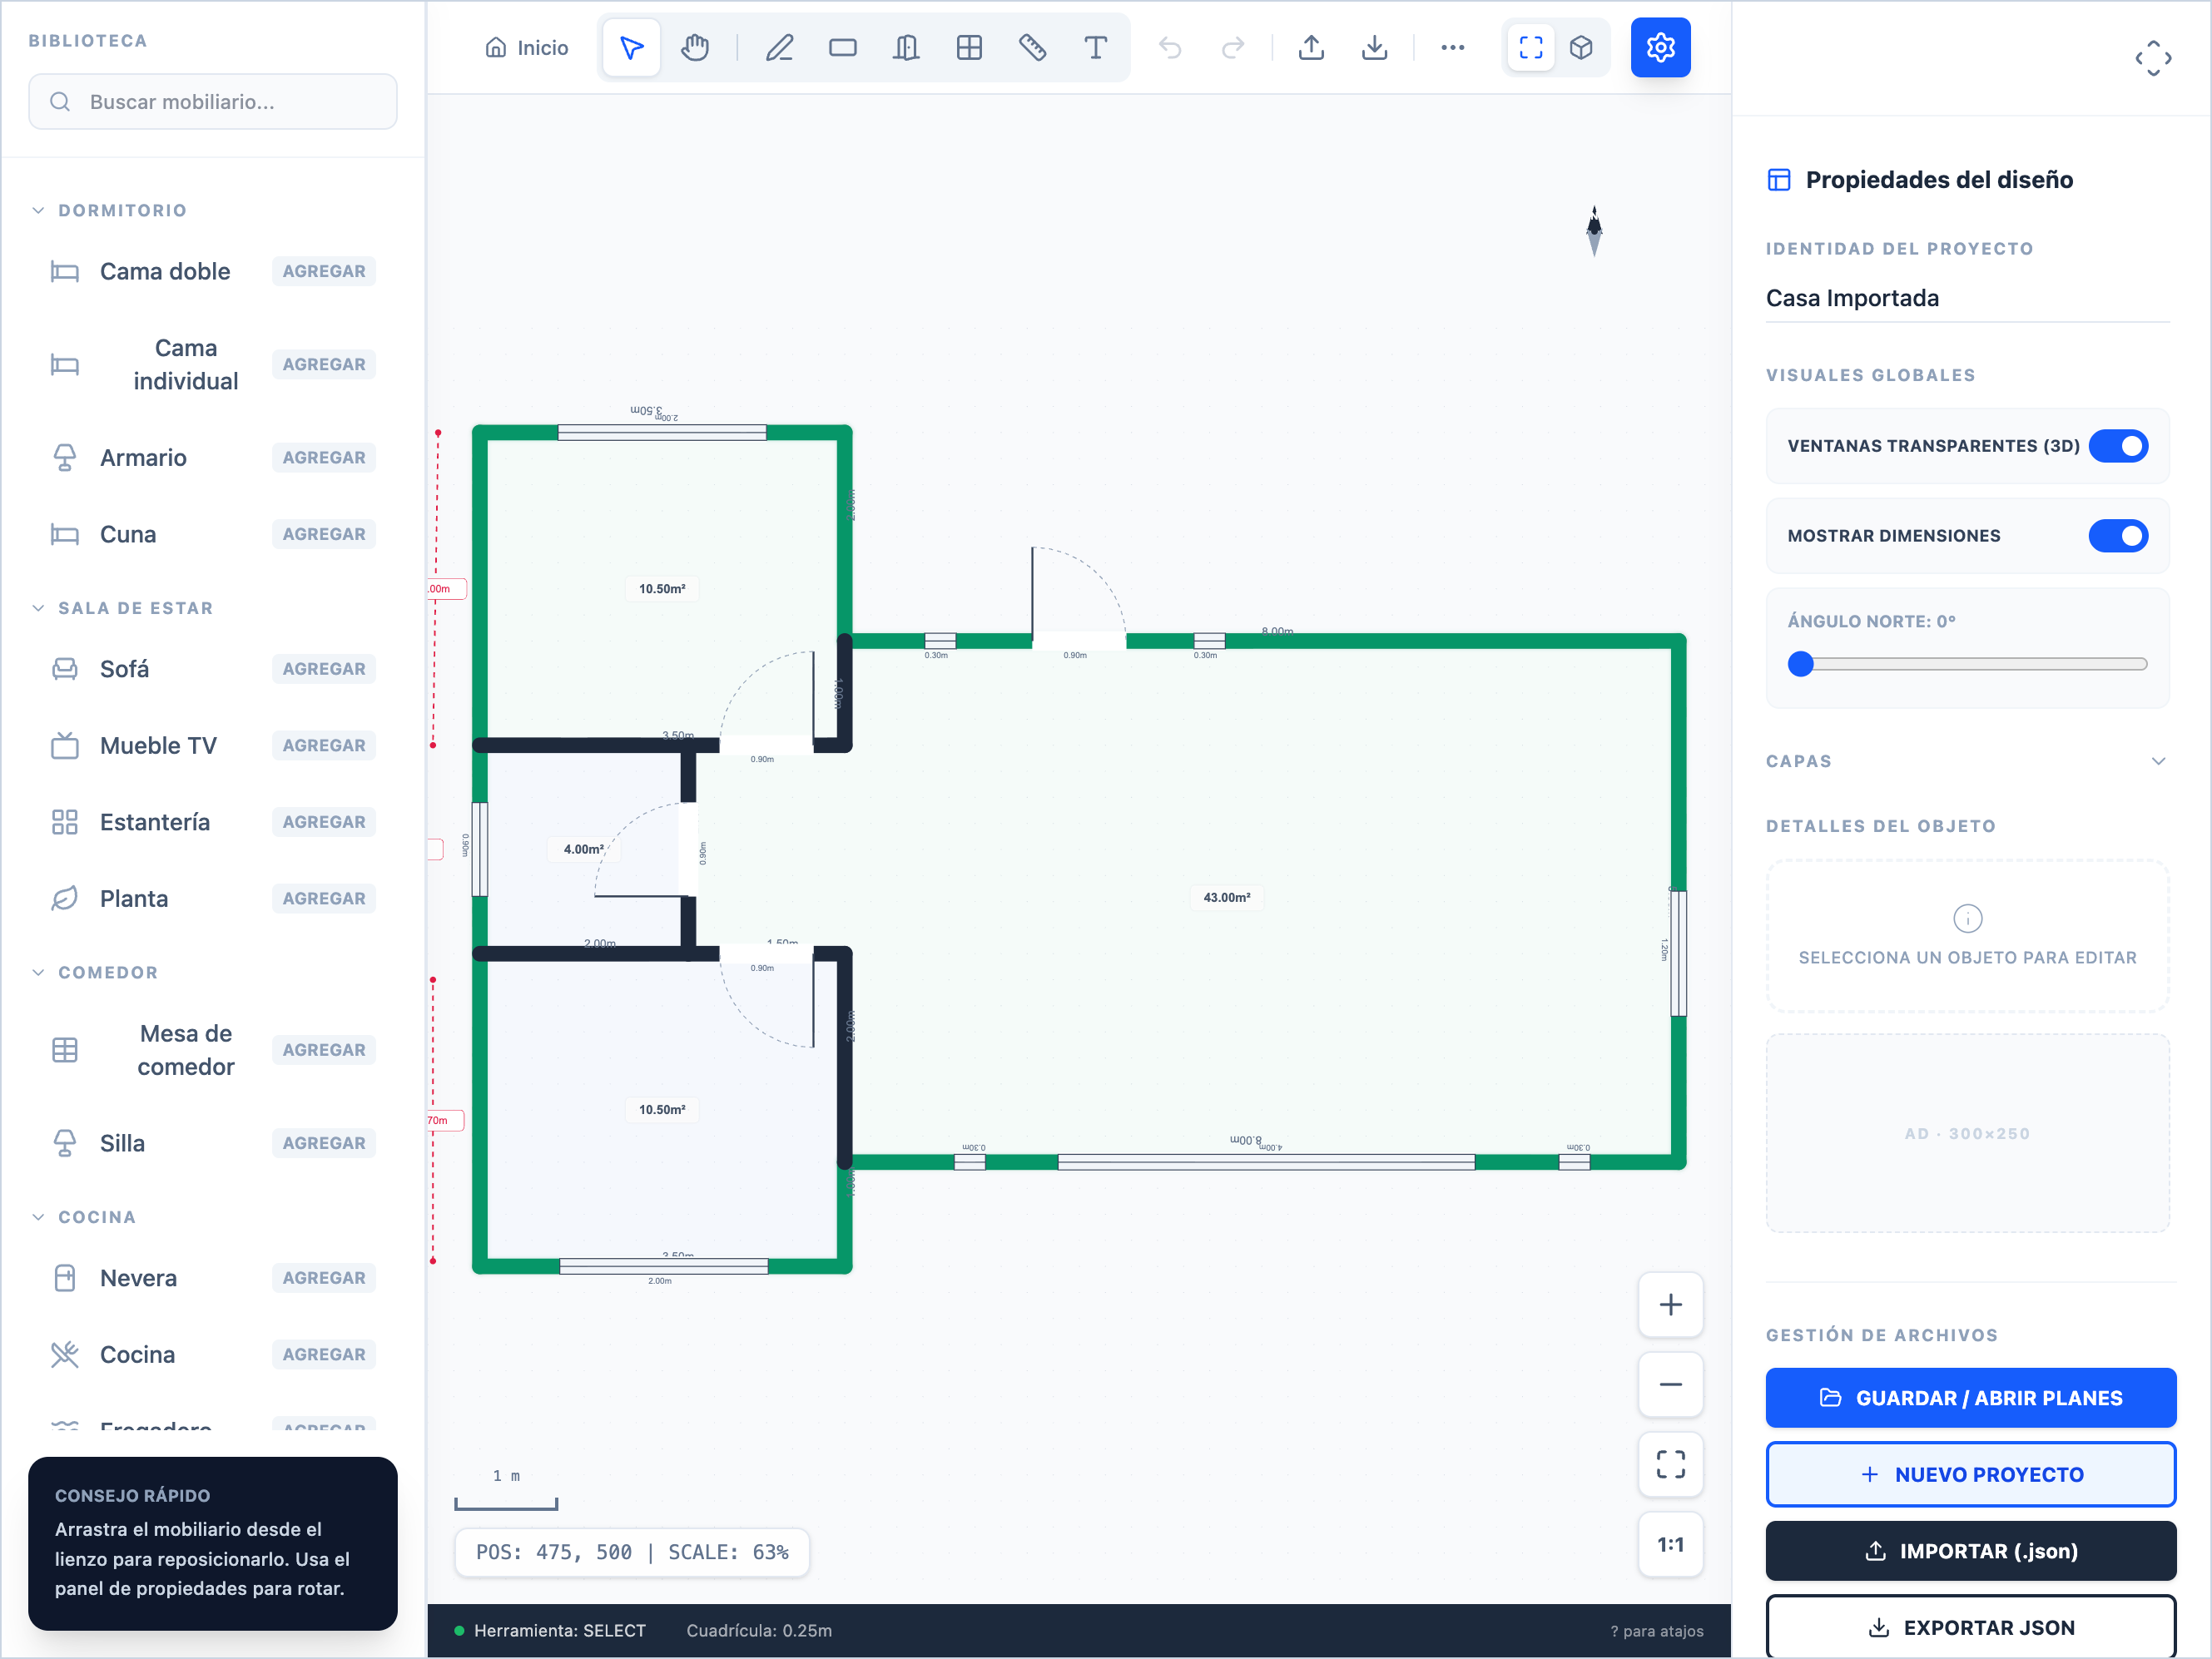
Vista del editor en modo 2D con un plano en construcción. Las cotas se calculan automáticamente en tiempo real.
Las Herramientas del Editor
La barra de herramientas de ArqPlano está diseñada para ser intuitiva. Cada herramienta tiene un propósito específico, y conocerlas bien acelera enormemente el flujo de trabajo.
- Selección (flecha): La herramienta de uso más frecuente. Hacé clic sobre cualquier elemento para seleccionarlo y ver sus propiedades en el panel derecho. Arrastrá un elemento seleccionado para moverlo. Para seleccionar múltiples elementos a la vez, dibujá un rectángulo de selección arrastrando en el canvas con la herramienta de selección activa.
- Mano (paneo): Útil cuando el plano es grande y necesitás desplazarte por el canvas sin el riesgo de mover o seleccionar objetos accidentalmente. También podés activar el paneo temporalmente en cualquier momento manteniendo presionada la barra espaciadora.
- Paredes (lápiz): Dibuja segmentos de pared. Cada clic establece un nuevo punto. Los segmentos se encadenan automáticamente. Presioná Escape para terminar una cadena de paredes sin cerrar el recinto.
- Puertas y ventanas: Al activar esta herramienta, el cursor muestra el elemento que vas a colocar. Hacé clic sobre cualquier pared existente para insertar la abertura. La posición se puede ajustar después arrastrando a lo largo de la pared.
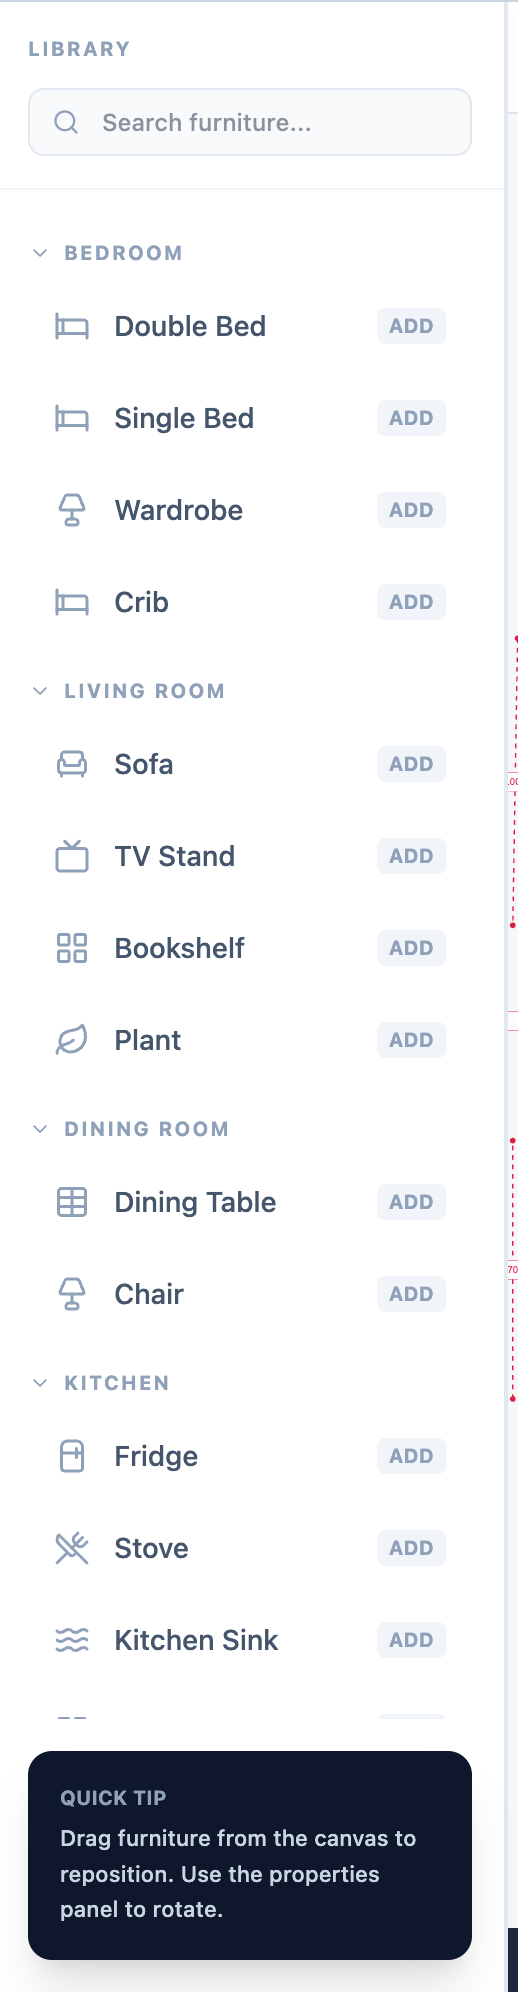
- Mobiliario: Abre el panel de la biblioteca de muebles. Hacé clic en cualquier elemento del catálogo para colocarlo en el centro del canvas, luego arrastralo a la posición deseada.
- Medidas: Activa o desactiva la visualización de las cotas de medición sobre las paredes. Útiles cuando estás preparando una imagen para mostrar a un constructor o arquitecto.
- Texto: Permite agregar etiquetas de texto libre al plano. Ideal para nombrar los ambientes: "Dormitorio Principal", "Living", "Cocina", etc.
- Vista 3D: Cambia el canvas del modo 2D planta al modo 3D interactivo. Todos los cambios que hagas en 2D se reflejan instantáneamente cuando volvés a la vista 3D.
Agregar Puertas y Ventanas
Las aberturas (puertas y ventanas) son elementos que se insertan dentro de una pared existente. No podés colocar una puerta en el aire: siempre debe estar sobre una pared. ArqPlano calcula automáticamente la apertura en la pared y en la vista 3D muestra el hueco correspondiente.
-
Seleccioná la herramienta de Puertas o Ventanas
En la barra lateral izquierda, hacé clic en el ícono de puerta o ventana. El panel lateral mostrará las opciones disponibles: tipo de puerta (simple, doble, corredera), ancho y sentido de apertura.
-
Hacé clic sobre la pared donde querés colocar la abertura
La puerta o ventana se inserta automáticamente en el punto más cercano de la pared al lugar donde hiciste clic. No necesitás ser exacto con el clic — el snap la ajusta a la pared.
-
Ajustá la posición arrastrando a lo largo de la pared
Con la abertura seleccionada, podés arrastrarla a lo largo de la pared para posicionarla exactamente donde necesitás. También podés escribir la distancia exacta desde el extremo de la pared en el campo del panel lateral.
-
Modificá el ancho de la abertura
Seleccioná la puerta o ventana y cambiá el valor de ancho en el panel lateral. Los cambios se aplican en tiempo real tanto en 2D como en 3D.
-
Cambiá el sentido de apertura (puertas)
Para las puertas, podés invertir el sentido de apertura (hacia adentro/afuera, izquierda/derecha) desde el panel lateral. El arco de apertura se actualiza instantáneamente en el plano 2D, lo que te permite verificar que la puerta no colisiona con muebles o paredes.
-
Verificá en vista 3D
Pasá a la vista 3D para confirmar que las aberturas tienen el tamaño correcto y que generan los huecos esperados en los muros. Las ventanas muestran el alféizar y el dintel en la vista 3D.
Para puertas exteriores de ingreso, usá un ancho de 90 cm (es el estándar que permite el acceso con muebles). Para dormitorios y baños, 80 cm es suficiente. Cocina y living conviene mantenerlos en 90 cm para mayor comodidad de circulación. Las ventanas habitacionales standard van de 100 a 150 cm de ancho y 100 a 120 cm de alto.
La Biblioteca de Mobiliario
ArqPlano incluye más de 50 elementos de mobiliario organizados por categoría. El mobiliario no es solo decorativo: te permite verificar si las dimensiones de los ambientes son funcionales, si los muebles caben sin obstruir circulaciones, y si los artefactos sanitarios tienen el espacio libre reglamentario.
La biblioteca de mobiliario incluye elementos para todos los ambientes: living, dormitorio, cocina, baño, comedor y exteriores.
Las categorías disponibles son:
- Sala de estar: sofás, sillones, mesa de centro, rack de TV, alfombras.
- Dormitorio: camas simples y dobles, placard, mesa de luz, escritorio.
- Cocina: módulos de cocina en L y U, heladera, horno, lavarropa.
- Baño: inodoro, bidet, ducha, bañera, vanitory, toallero.
- Comedor: mesas de 4, 6 y 8 personas con sillas.
- Oficina: escritorios, silla de oficina, estante.
- Exterior: mesa de jardín, reposera, parrilla.
Para colocar un mueble: hacé clic en el ícono de mobiliario de la barra lateral → se abre el panel de catálogo → hacé clic en el elemento deseado → aparece en el centro del canvas. Luego arrastralo a la posición definitiva. Para rotar un mueble, seleccionalo y usá el control de rotación que aparece sobre él o ingresá el ángulo en el panel lateral. Para redimensionar, arrastrá los tiradores de las esquinas. Para duplicar un mueble, seleccionalo y presioná Ctrl+D — útil para habitaciones con muebles simétricos.
La Vista 3D en Tiempo Real
Una de las características más valoradas de ArqPlano es la vista 3D instantánea. Con un solo clic podés ver cómo queda tu plano convertido en un volumen tridimensional — con paredes, huecos de puertas y ventanas, mobiliario y pisos.
Para activar la vista 3D hacé clic en el botón "3D" de la barra de herramientas. La transición es inmediata. Dentro de la vista 3D podés:
- Rotar la vista: Hacé clic y arrastrá en cualquier dirección para orbitar alrededor del modelo.
- Hacer zoom: Usá la rueda del mouse para acercarte o alejarte.
- Desplazarte (paneo): Arrastrá con el botón derecho del mouse o con dos dedos en trackpad.
La vista 3D muestra en tiempo real: paredes con su grosor real, huecos de puertas y ventanas correctamente recortados en los muros, mobiliario con sus dimensiones a escala, y el piso de cada ambiente. La altura de las paredes por defecto es 250 cm (2,5 metros, el estándar residencial), pero podés modificarla pared por pared desde el panel lateral en vista 2D.
Usá la vista 3D específicamente para verificar que ningún mueble bloquea el arco de apertura de las puertas al abrirse, y que los espacios de circulación sean cómodos. Como referencia: 90 cm es el mínimo para circulaciones principales (pasillo entre comedor y cocina, acceso a dormitorio), y 60 cm es el mínimo aceptable para circulaciones secundarias.
Guardar y Exportar tu Plano
ArqPlano guarda automáticamente el estado del plano en el almacenamiento local de tu navegador (localStorage) a medida que trabajás. No necesitás acordarte de guardar manualmente — si cerrás accidentalmente la pestaña y volvés a abrir arqplano.com, tu plano va a seguir ahí.
Guardado manual con nombre: Usá el botón Guardar de la barra superior para guardar el plano con un nombre personalizado. Podés tener múltiples planos guardados (por ejemplo, "Planta baja", "Primer piso", "Alternativa con estudio") y alternar entre ellos.
Exportar como imagen PNG: Hacé clic en el botón de descarga/exportar de la barra superior. Descarga una imagen de alta resolución del plano 2D con las cotas visibles — ideal para imprimir, enviar por WhatsApp o adjuntar a un correo al arquitecto.
Cargar planos guardados: Hacé clic en el ícono de carpeta en la barra superior → se abre la lista de planos guardados → seleccioná el que querés cargar.
El guardado de ArqPlano es local en tu navegador. Si limpiás el caché del navegador, usás un navegador diferente o accedés desde otro dispositivo, no vas a encontrar tus planos guardados. Para no perder tu trabajo, exportá como PNG después de cada sesión de diseño, y si necesitás una copia de seguridad completa del archivo del proyecto, usá la opción de exportar JSON desde el menú de guardado.
Atajos de Teclado
Los atajos de teclado aceleran enormemente el trabajo en cualquier editor. ArqPlano soporta los atajos estándar de productividad más los específicos del editor:
| Atajo | Acción |
|---|---|
| Ctrl + Z | Deshacer la última acción |
| Ctrl + Y / Ctrl + Shift + Z | Rehacer |
| Delete / Backspace | Eliminar el elemento seleccionado |
| Escape | Cancelar la herramienta activa / deseleccionar |
| Espacio + arrastrar | Paneo temporal del canvas (sin cambiar de herramienta) |
| Rueda del mouse | Zoom in / zoom out centrado en el cursor |
| Ctrl + A | Seleccionar todos los elementos del plano |
| Ctrl + D | Duplicar el elemento seleccionado |
Consejos Pro para Mejores Planos
Estos consejos son los que separan un plano "funcional" de un plano verdaderamente útil para tomar decisiones de diseño y compartir con profesionales.
- Empezá siempre por el perímetro exterior antes de las paredes interiores. Si el contorno de la planta no está bien definido, todas las paredes internas quedarán mal posicionadas. El perímetro es la estructura que da sentido a todo lo demás.
- Aprovechá la grilla de 25 cm. Cada cuadradito de la grilla equivale a 25 cm. Una habitación de 3 metros son 12 cuadrados. Trabajar con la grilla activada garantiza que todas las medidas sean múltiplos de 25 cm, lo que facilita la comunicación con constructores y hace los presupuestos más precisos.
- Planificá la circulación antes de colocar muebles. El layout de muebles debe dejar siempre un pasillo libre de al menos 90 cm en las circulaciones principales (el recorrido que hacés varias veces por día) y 60 cm en las secundarias. Verificá esto con la vista 3D antes de dar el diseño por aprobado.
- Dibujá los baños con todos los artefactos. El baño es el ambiente donde más fácil es cometer errores de dimensionamiento. Coloca el inodoro, el bidet, la ducha o bañera y el vanitory en el plano, y verificá que cada artefacto tenga el espacio libre reglamentario: 50 cm frontales al inodoro y bidet, 60 cm mínimos para la ducha, 70 cm entre artefactos.
- Usá la función de duplicado para ambientes simétricos. Si tu planta tiene dos dormitorios de igual tamaño, diseñá uno completo con sus muebles, seleccioná todo (Ctrl+A en ese recinto) y duplicalo (Ctrl+D). Luego solo ajustá la posición.
- Verificá cada puerta en vista 3D antes de dar el layout por definitivo. Muchas veces una puerta que "entra" en el plano 2D no puede abrirse completamente porque hay un mueble en el radio de apertura. La vista 3D lo detecta instantáneamente.
- Las cotas automáticas son tus aliadas para el presupuesto. Con las cotas visibles, exportá el PNG del plano. Ese archivo tiene toda la información dimensional que un contratista necesita para dar una primera estimación de costos de materiales y mano de obra.
- Guardá versiones alternativas. Si estás dudando entre dos distribuciones de cocina, guardá cada una con un nombre diferente ("Cocina opción A" y "Cocina opción B") y comparalas en 3D. ArqPlano guarda múltiples planos sin límite.
¿Para Qué Sirve ArqPlano?
ArqPlano se adapta a situaciones muy distintas. Estos son los casos de uso más frecuentes entre sus usuarios:
- Propietarios planificando una reforma: Antes de demoler una pared o mover una cocina, visualizá el resultado en 3D. Probar distribuciones en ArqPlano no cuesta nada; probarlas en la obra real cuesta mucho. Tener el plano claro antes de hablar con el arquitecto o el constructor también ahorra horas de reuniones y reduce los malentendidos.
- Familias organizando una mudanza: ¿Entra el sillón en el living nuevo? ¿La cama doble cabe en el dormitorio principal? Medí el espacio, cargalo en ArqPlano, colocá los muebles a escala real y tenés la respuesta en minutos — antes de contratar el camión de mudanza.
- Personas construyendo su primera casa: Diseñar el plano antes de contratar a un arquitecto te permite llegar a la primera reunión con una idea clara, ahorrarte idas y vueltas de bocetos, y comunicar exactamente qué querés. Muchos arquitectos valoran que el cliente tenga una idea inicial definida.
- Constructores comunicando propuestas a clientes: Mostrarle a un cliente cómo va a quedar su casa con una vista 3D interactiva es mucho más efectivo que una planta técnica. ArqPlano permite crear esas visualizaciones rápidamente sin software especializado.
- Estudiantes de arquitectura y diseño de interiores: Para practicar distribuciones, explorar proporciones de espacios y comunicar ideas de manera rápida sin necesitar licencias de software costoso.
- Inmobiliarias y desarrolladores: Para crear layouts referenciales de propiedades, mostrar opciones de distribución a potenciales compradores o generar materiales gráficos simples sin contratar renderistas.
¡Empezá a Diseñar Ahora!
Ya tenés todo lo que necesitás para crear tu primer plano arquitectónico con ArqPlano. La mejor forma de aprender es haciendo: abrí el editor, dibujá el perímetro de una habitación, colocá una puerta y mirá el resultado en 3D. Ese primer resultado en menos de 5 minutos te va a dar la confianza para ir más lejos.
ArqPlano es y siempre va a ser gratuito para su uso básico. No hay registro, no hay tarjeta de crédito, no hay límite de planos guardados. Solo abrís el navegador y empezás a diseñar.
Si encontrás algún problema o tenés sugerencias para mejorar ArqPlano, escribinos desde la página de Contacto. Tu feedback ayuda a mejorar la herramienta para todos los usuarios.