¿Por qué el aislamiento térmico es fundamental?
El sector de la edificación es responsable del 40% del consumo energético global, más que la industria o el transporte por separado. La mayor parte de esa energía se destina a calentar y refrigerar espacios que, en muchos casos, están mal aislados: el calor entra fácilmente en verano y se escapa sin freno en invierno, obligando a los equipos de climatización a trabajar constantemente.
Un buen sistema de aislamiento térmico permite reducir entre un 30% y un 50% el consumo de calefacción y refrigeración. Esto se traduce en facturas de gas y electricidad notablemente más bajas desde el primer invierno. Pero los beneficios van más allá de lo económico: una casa bien aislada mantiene temperaturas interiores más estables, elimina las paredes frías donde se condensa el vapor de agua (principal causa de humedad y hongos), y ofrece un nivel de confort muy superior al de una construcción convencional.
Desde el punto de vista ambiental, cada kilowatt-hora que no consumimos evita la emisión de CO₂ a la atmósfera. En un contexto donde las normas de eficiencia energética son cada vez más estrictas en toda Latinoamérica, invertir en aislamiento hoy es también proteger el valor futuro de la propiedad.
La relación entre inversión inicial y ahorro a largo plazo es muy favorable: en la mayoría de los casos, el costo del aislamiento se recupera en 5 a 10 años a través del ahorro en energía, y después de ese período el beneficio es puro. A diferencia de los electrodomésticos eficientes, el aislamiento no se deprecia ni requiere mantenimiento.
El Valor R y la Transmitancia Térmica (U)
Para hablar de aislamiento con precisión, es necesario manejar dos conceptos fundamentales: el valor R (resistencia térmica) y la transmitancia U (conductancia o coeficiente global de transferencia de calor). Son inversos el uno del otro, pero se usan en contextos distintos.
¿Qué es el valor R?
El valor R mide la resistencia que opone un material al flujo de calor. A mayor valor R, mejor aislante es el material. Se calcula con la fórmula:
R = espesor (m) ÷ conductividad térmica λ (W/m·K)
Un material con λ = 0.04 W/m·K (lana de vidrio) en 50 mm de espesor tiene R = 0.050 ÷ 0.04 = 1.25 m²·K/W. Para duplicar ese valor R, podemos doblar el espesor o usar un material con menor λ.
¿Qué es la transmitancia U?
La transmitancia U es el valor que describe cuánto calor pasa a través de un elemento constructivo completo (pared, techo, vidrio) por cada grado de diferencia de temperatura entre interior y exterior. Se mide en W/m²·K. Cuanto más bajo es U, mejor aísla el conjunto. U = 1/R (incluyendo resistencias superficiales).
Los códigos de construcción modernos exigen valores U máximos para distintos elementos. Una pared con U = 0.4 W/m²·K es considerada eficiente; una ventana de doble vidrio con U = 1.1 es mucho mejor que una ventana de vidrio simple con U = 5.8.
Valores R típicos por material y espesor
| Material | λ (W/m·K) | R por 50 mm | R por 100 mm |
|---|---|---|---|
| Lana de vidrio | 0.040 | 1.25 | 2.50 |
| EPS (poliestireno expandido) | 0.036 | 1.39 | 2.78 |
| Lana mineral (roca) | 0.038 | 1.32 | 2.63 |
| Poliuretano proyectado | 0.024 | 2.08 | 4.17 |
| XPS (poliestireno extruido) | 0.028 | 1.79 | 3.57 |
| Fibra de celulosa | 0.038 | 1.32 | 2.63 |
En zonas frías (Patagonia, Andes, sur de Chile y Uruguay), el código de construcción exige valores R mínimos de 2.5 m²·K/W para muros y 3.5 m²·K/W para techos. En zonas templadas los mínimos son menores, pero siempre conviene superar el mínimo normativo para mejorar el confort y el ahorro.
Principales Materiales Aislantes
El mercado ofrece una amplia variedad de materiales aislantes, cada uno con características específicas en términos de rendimiento, facilidad de instalación, resistencia a la humedad y costo. A continuación, los más relevantes para el mercado latinoamericano:
Lana de vidrio (fibra de vidrio)
Es el material más utilizado mundialmente. Se fabrica a partir de vidrio reciclado fundido que se convierte en fibras muy finas. Disponible en rollos, mantas y planchas rígidas. Su λ de 0.040 W/m·K es buena, aunque no la mejor del mercado. Es fácil de cortar y manipular, pero requiere guantes y mascarilla durante la instalación por la irritación que causan las fibras. Costo aproximado: $4–12/m² según espesor.
Lana de roca (lana mineral)
Similar a la lana de vidrio en performance térmica (λ = 0.038), pero con una ventaja clave: es no combustible. Puede soportar temperaturas de hasta 1.000°C sin fundirse, lo que la hace obligatoria en elementos con requisito de resistencia al fuego (fachadas REI-60, cámaras de incendio). También ofrece mejor absorción acústica que la lana de vidrio. Costo: $6–15/m².
Poliestireno expandido (EPS / telgopor)
El EPS es el aislante más conocido en Argentina y Bolivia. Ligero, rígido, impermeable al agua líquida y muy fácil de conseguir. Su λ = 0.036 lo hace ligeramente mejor que las lanas. Se usa en placas para contrapisos, fachadas (SATE), techos y muros. Una limitación: es combustible (aunque los grados ignifugados reducen este riesgo). Costo: $5–10/m².
Poliestireno extruido (XPS)
El XPS tiene una estructura celular cerrada que lo hace prácticamente impermeable al vapor de agua, con una λ = 0.028 W/m·K. Es más denso y resistente a la compresión que el EPS, lo que lo hace ideal para aplicaciones bajo suelo (debajo de losas, en sótanos o en contacto con el terreno) donde la humedad es un factor crítico. Costo mayor: $10–20/m².
Poliuretano proyectado (spray foam)
Con λ = 0.024 W/m·K, el poliuretano proyectado ofrece el mejor valor R por centímetro de espesor entre los materiales convencionales. Además de aislar, actúa como barrera de vapor y sella completamente la envolvente, eliminando infiltraciones de aire frío. Requiere aplicación profesional con equipamiento especializado. Costo: $20–45/m² instalado.
Poliuretano rígido (paneles PIR)
Los paneles de poliisocianurato (PIR) tienen λ = 0.022 W/m·K, los más eficientes en formato rígido. Se usan en isopaneles, cubiertas planas y sistemas de fachada ventilada industriales. Su bajo espesor relativo los hace valiosos cuando el espacio es limitado.
Fibra de celulosa (insuflada)
Fabricada con papel de diario reciclado tratado con sales de boro (ignifugado y fungicida). Se insuflca con sopladores en cámaras de aire y tabiques, alcanzando rincones y formas irregulares que los paneles rígidos no pueden cubrir. Excelente elección para rehabilitaciones y para quienes priorizan materiales ecológicos. λ = 0.038, Costo: $8–18/m².
Aerogel
El aerogel es el material sólido menos denso conocido, con λ = 0.015 W/m·K, aproximadamente la mitad que el poliuretano. Se usa en rehabilitaciones donde el espacio disponible para aislación es mínimo (paredes históricas, interiores de departamentos) y en aplicaciones industriales críticas. Su costo elevado —$80–200/m²— limita su uso masivo, pero su rendimiento es imbatible.
| Material | λ (W/m·K) | R / 50mm | Costo/m² | Resist. humedad | Aplicación principal |
|---|---|---|---|---|---|
| Lana de vidrio | 0.040 | 1.25 | $4–12 | Media | Muros, techos, entre vigas |
| Lana de roca | 0.038 | 1.32 | $6–15 | Media | Fachadas RF, acústica |
| EPS | 0.036 | 1.39 | $5–10 | Alta | SATE, contrapisos, techos |
| XPS | 0.028 | 1.79 | $10–20 | Muy alta | Bajo tierra, sótanos |
| Poliuretano spray | 0.024 | 2.08 | $20–45 | Muy alta | Techos, sellos, puentes térmicos |
| PIR (rígido) | 0.022 | 2.27 | $15–30 | Alta | Isopaneles, cubiertas planas |
| Celulosa insuflada | 0.038 | 1.32 | $8–18 | Media | Cavidades, rehabilitación |
| Aerogel | 0.015 | 3.33 | $80–200 | Alta | Espacios reducidos, patrimonio |
El poliuretano proyectado (SPF) actúa simultáneamente como aislante y barrera de vapor. Es la opción más eficiente para techos industriales y para sellar puentes térmicos en uniones complejas. Al no dejar juntas ni costuras, elimina los puntos débiles típicos de los sistemas con planchas.
¿Dónde Aislar? Prioridades por Superficie
Un presupuesto de aislamiento siempre tiene límites. Por eso, es importante conocer el orden de prioridades: ¿por dónde se escapa más calor? La respuesta depende de cada edificio, pero las estadísticas generales dan una guía clara.
1. Techo y cubierta (30–40% de las pérdidas)
El aire caliente sube: en invierno, toda la calefacción tiende a acumularse en la parte alta del ambiente y luego escapar por el techo. En verano, el techo es la superficie que más radiación solar recibe. Aislar el techo es siempre la intervención con mayor retorno de inversión, especialmente en viviendas con ático o cielorraso suspendido, donde la instalación del aislante es relativamente sencilla y económica.
2. Muros y paredes exteriores (20–30% de las pérdidas)
Las paredes son la mayor superficie de la envolvente. En una casa de 80 m² de planta con 3 metros de altura, la superficie de muros exteriores puede superar los 150 m². Incluso con una densidad de pérdida menor que el techo, la suma total es significativa. Aislar los muros mejora notablemente el confort en invierno (elimina la sensación de "pared fría") y reduce la condensación superficial.
3. Piso sobre terreno o sótano (10–15% de las pérdidas)
El piso en contacto con el terreno o sobre un espacio no climatizado (cochera, sótano) es fuente de pérdida térmica permanente. El suelo tiene una temperatura relativamente estable (entre 12 y 16°C en la mayoría de las zonas) pero en invierno es más frío que el interior, generando pérdida constante. Se soluciona con XPS o EPS bajo la losa de contrapiso.
4. Ventanas y puertas (15–25% de las pérdidas)
Las aberturas no son "aislamiento" en el sentido estricto, pero son los puntos de mayor transferencia térmica de la envolvente. Un vidrio simple tiene U = 5.8 W/m²·K, lo que significa que pierde calor unas 10 veces más rápido que una pared bien aislada. Cambiar a doble vidrio o mejorar los burletes es a menudo la intervención más rápida y económica en una rehabilitación.
5. Puentes térmicos (impacto variable, difícil de cuantificar)
Los puentes térmicos son elementos constructivos que "cortocircuitan" la barrera aislante: vigas de hormigón que atraviesan la pared, pilares de acero, fijaciones metálicas, encuentros entre losa y muro. Aunque la superficie es pequeña, la conductividad alta de estos elementos puede representar el 20–30% de las pérdidas totales en edificios modernos bien aislados. El sistema SATE (aislamiento exterior continuo) es la solución más efectiva porque cubre también los puentes térmicos estructurales.
Técnicas de Aislamiento por Sistema Constructivo
La forma de instalar el aislamiento depende del sistema constructivo del edificio y del momento de la obra (construcción nueva vs. rehabilitación). Las principales técnicas son:
Aislamiento exterior continuo (SATE/EIFS)
El Sistema de Aislamiento Térmico por el Exterior (SATE) consiste en pegar placas rígidas de EPS, mineral wool o XPS directamente sobre la fachada existente, y luego aplicar una malla de refuerzo y un mortero de terminación. Es la técnica con mejor rendimiento térmico porque cubre completamente la estructura, eliminando los puentes térmicos. Además, no reduce la superficie interior habitable. Costo instalado: $25–50/m².
Aislamiento interior (trasdosado)
Consiste en adosar un tabique de lana mineral + placa de yeso (o EPS + yeso) por el interior del muro exterior. Es más económico que el SATE y se puede ejecutar ambiente por ambiente durante una reforma. Su desventaja: reduce ligeramente el espacio interior (3–8 cm por muro) y no elimina los puentes térmicos de la estructura. Costo: $15–35/m².
Aislamiento en cámara de aire
Muchos muros dobles tienen una cámara de aire de 3–5 cm entre ambas hojas. Si esa cámara está vacía, puede rellenarse con celulosa insuflada o poliuretano proyectado a través de pequeños orificios en la fachada, sin demoler nada. Es la técnica ideal para rehabilitaciones de viviendas construidas entre 1960 y 1990 que tengan esta tipología de muro.
Aislamiento de cubierta plana (sobre tablero)
En techos planos, las planchas de XPS o PIR se colocan directamente sobre la losa (aislamiento invertido) o entre la losa y la impermeabilización (aislamiento bajo membrana). El sistema invertido con XPS es el más recomendado porque protege la impermeabilización de los ciclos térmicos.
Aislamiento de cubierta inclinada (entre o sobre cabios)
En techos a dos aguas o inclinados, el aislamiento se puede instalar entre los cabios/viguetas (lana mineral a presión) o sobre el tablero de cubierta (PIR o EPS). Lo ideal es combinar ambas posiciones para eliminar los puentes térmicos de los cabios.
Cómo instalar aislamiento de techo con lana mineral
-
Medí el espacio entre viguetas
Con una cinta métrica, registrá el ancho libre entre viguetas o cabios. No es siempre uniforme: medí varios puntos. La plancha deberá cortarse 1–2 cm más ancha que el espacio libre para que quede ajustada a presión.
-
Cortá las planchas con el ajuste correcto
Usá una regla metálica y cutter para cortar la lana mineral. Para espesores mayores a 100 mm, convierte en dos capas y trabaja en dos etapas. Siempre corta en un área ventilada y usá protección respiratoria.
-
Instalá la barrera de vapor al lado caliente
La barrera de vapor (polietileno o papel kraft aluminizado) va siempre del lado interior (caliente en invierno). En techos habitados, esto significa debajo de la lana antes de colocar el cielorraso. Sellá las juntas y bordes con cinta de barrera de vapor.
-
Encajá las planchas entre las viguetas
Presioná las planchas hacia arriba entre los cabios. La cara aluminizada (si la tiene) debe quedar mirando hacia abajo, al interior. Verificá que no queden huecos en los bordes ni entre planchas consecutivas.
-
Sellá todas las juntas
Las juntas entre planchas y los encuentros con muros o pilares son los puntos débiles del sistema. Usá espuma de poliuretano en aerosol o cinta acrílica de sellado para rellenar cualquier abertura. Un sistema sin juntas selladas pierde hasta el 30% de su eficiencia teórica.
Humedad y Barreras de Vapor
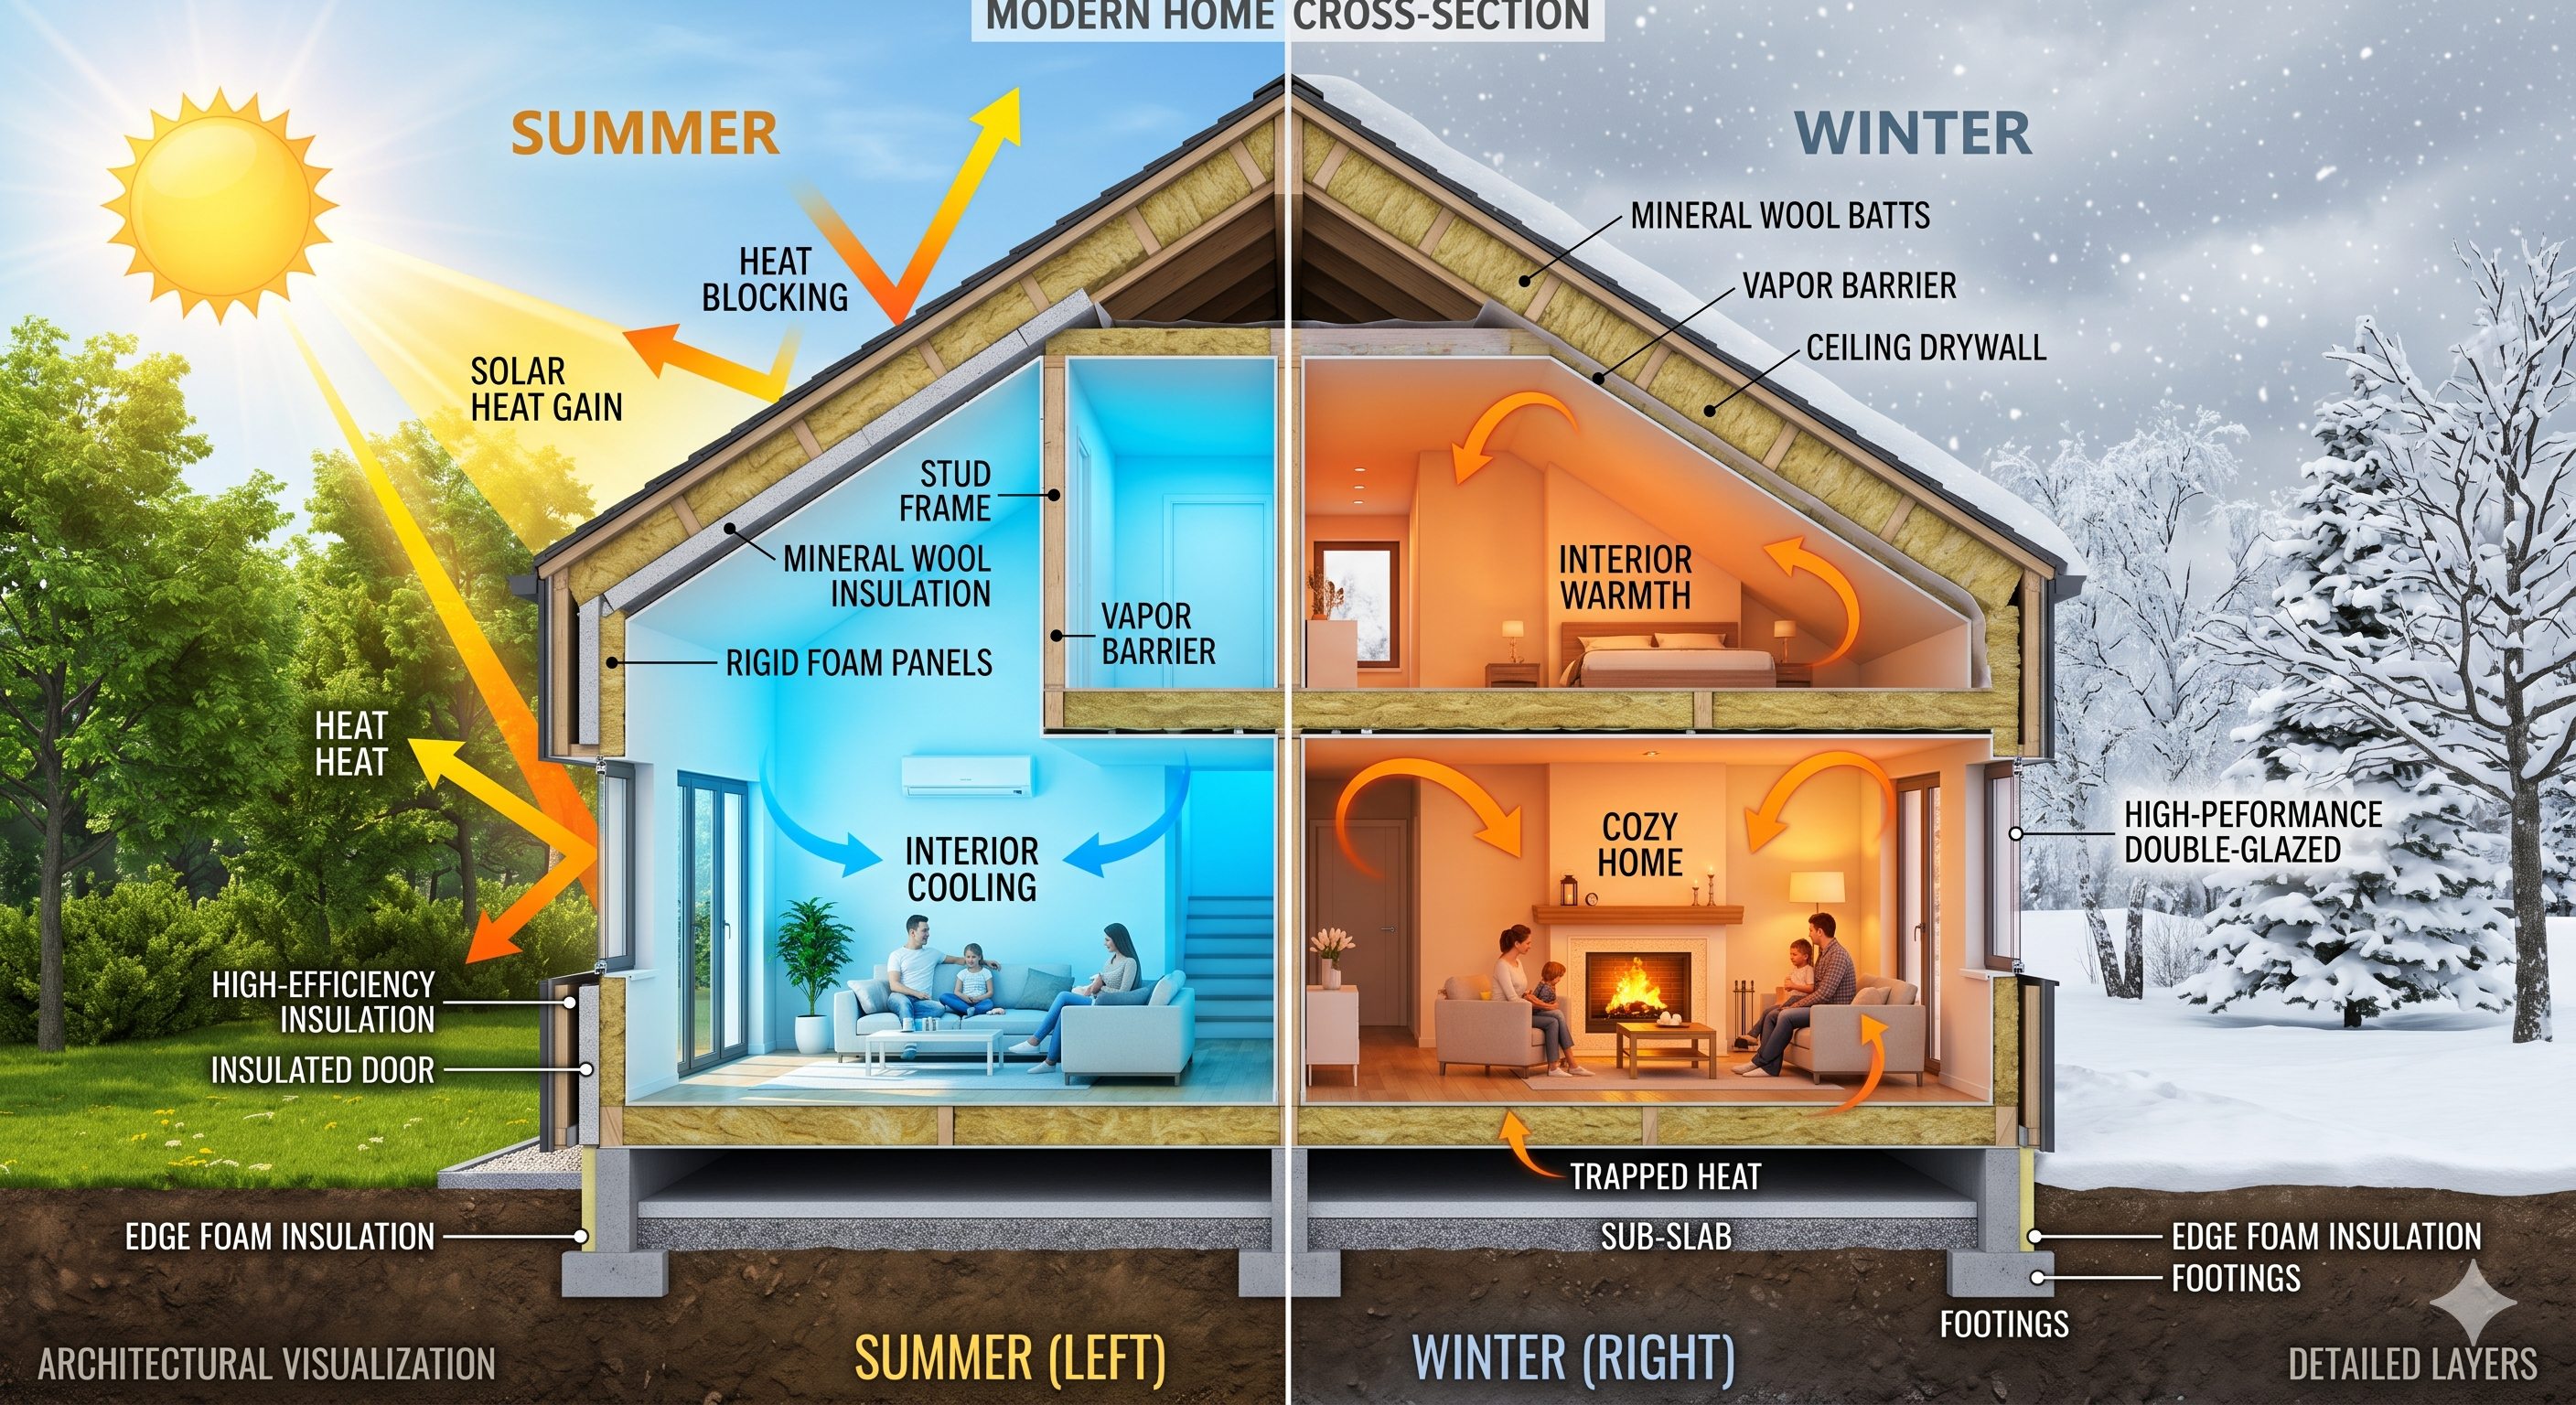
El agua es el principal enemigo del aislamiento. Un material aislante saturado de humedad pierde entre el 50% y el 80% de su capacidad aislante, además de pudrir la estructura de madera y generar hongos. Por eso, la gestión del vapor de agua es tan importante como elegir el material aislante correcto.
El mecanismo es el siguiente: el aire interior cálido contiene vapor de agua. Cuando ese aire migra hacia el exterior a través de la envolvente y encuentra una superficie más fría (el punto de rocío), el vapor se condensa en agua líquida. Si esa condensación ocurre dentro del aislante o del muro, el problema es serio.
La solución es la barrera de vapor: una membrana de polietileno o papel aluminizado que se coloca en el lado caliente del aislante para impedir que el vapor de agua interior penetre en la envolvente. En el hemisferio sur, el "lado caliente" en invierno es siempre el interior.
Nunca coloqués barrera de vapor en ambos lados del muro o del techo. El sistema debe poder liberar humedad hacia un solo lado (generalmente el exterior). Un muro sellado completamente por ambas caras atrapa la humedad que inevitablemente penetra y genera pudrición, hongos y deterioro acelerado de la estructura.
En baños, cocinas y lavanderías, donde la producción de vapor es alta, es especialmente importante la ventilación mecánica (extractores) para mantener la presión de vapor interior bajo control, complementando la barrera de vapor estructural.
Ventanas y Puertas: Aislamiento de Aberturas
Las ventanas son el eslabón débil de la envolvente térmica. Incluso en una casa bien aislada, ventanas de baja eficiencia pueden representar el 40–50% de las pérdidas totales. Conocer las opciones disponibles permite tomar decisiones fundamentadas.
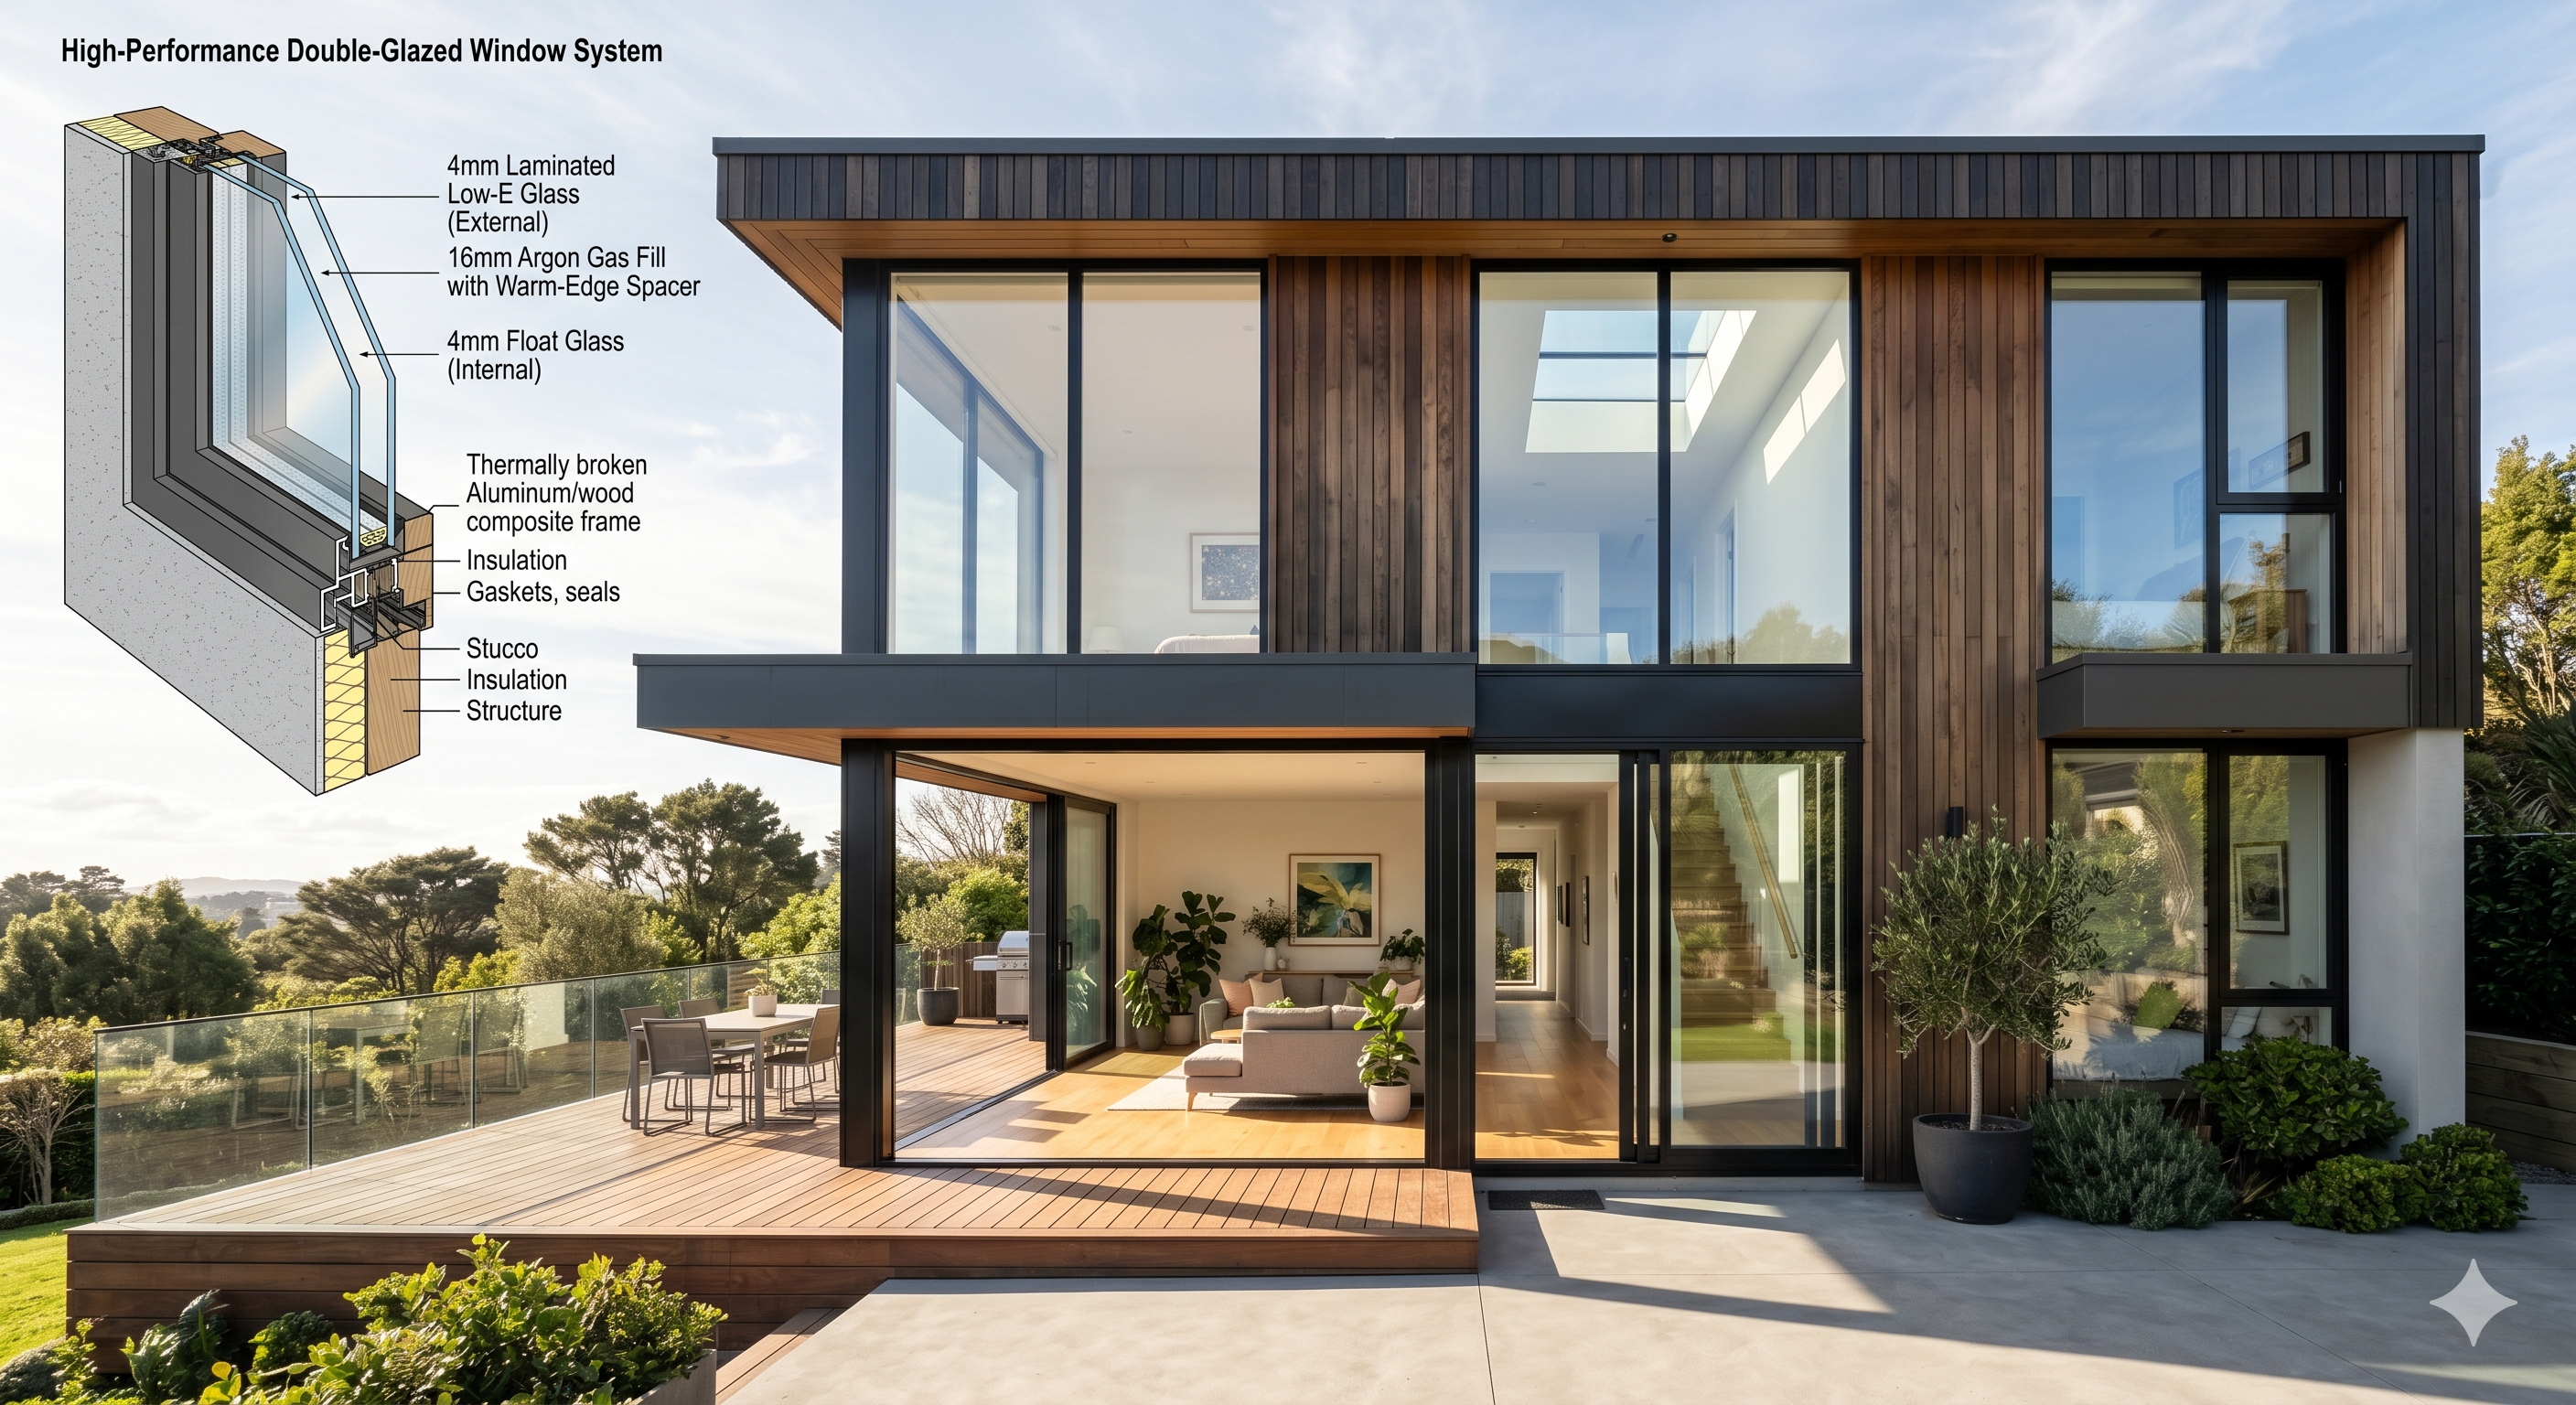
Doble vidriado hermético (DVH)
El doble vidriado (doble vidrio hermético o DVH) consiste en dos vidrios separados por una cámara de aire o gas inerte (argón o kriptón) sellada herméticamente. La cámara puede ser de 6, 12 o 16 mm. Un DVH de 4/12/4 (vidrio 4mm / cámara 12mm / vidrio 4mm) tiene U ≈ 2.8 W/m²·K, frente al U ≈ 5.8 de un vidrio simple. Con gas argón y vidrio bajo emisivo (Low-E), el U puede bajar hasta 1.1 W/m²·K.
Triple vidriado
El triple vidriado (tres vidrios, dos cámaras) es estándar en países nórdicos y alcanza valores U de 0.5–0.8 W/m²·K. En Latinoamérica no tiene difusión masiva, pero es la elección correcta para viviendas en la Patagonia, el altiplano boliviano o el sur de Chile donde las temperaturas invernales son severas.
Vidrios Low-E (baja emisividad)
Un recubrimiento de óxidos metálicos aplicado al vidrio (capa Low-E) refleja la radiación infrarroja de larga onda (calor) sin reducir la transmisión de luz visible. En invierno, refleja el calor interior hacia adentro. En verano, un vidrio Low-E de control solar refleja la radiación solar hacia el exterior, reduciendo las ganancias de calor. Es la tecnología más eficiente por el costo que implica.
Marco y sellado
El marco de la ventana puede anular todas las mejoras del vidrio. Los marcos de PVC tienen conductividades muy bajas y son la mejor opción térmica. Los marcos de aluminio, aunque duraderos y estéticos, conducen bien el calor: para ser eficientes deben tener rotura de puente térmico (RPT), un elemento aislante que separa las caras interior y exterior del perfil. Los burletes de compresión en el perímetro de hoja y marco son esenciales para eliminar infiltraciones de aire.
Costos y Retorno de Inversión
La decisión de aislar debe analizarse como una inversión con retorno medible, no como un gasto. Los números orientativos a continuación están basados en viviendas de zona templada-fría (Buenos Aires, Santiago, Montevideo) con calefacción a gas natural.
| Intervención | Costo instalado | Ahorro anual estimado | Payback aproximado |
|---|---|---|---|
| EPS 50mm en techo (100 m²) | $1.500–2.500 | $250–400/año | 5–7 años |
| SATE EPS 50mm en fachada (120 m²) | $3.000–6.000 | $300–500/año | 8–12 años |
| Trasdosado interior lana mineral (80 m²) | $1.200–2.800 | $200–350/año | 5–9 años |
| Spray foam en techo industrial (200 m²) | $4.000–9.000 | $600–1.200/año | 5–9 años |
| Cambio a DVH argón + Low-E (10 hojas) | $4.000–8.000 | $400–700/año | 8–14 años |
Como regla general, cada $1.000 invertidos en un buen sistema de aislamiento genera entre $150 y $250 de ahorro anual en energía, con un payback de 5 a 10 años. Después de recuperado, el ahorro es libre de costo por toda la vida útil del edificio (50–100 años).
Al planificar una obra nueva, siempre es más económico incorporar el aislamiento en la etapa de construcción que añadirlo posteriormente en una rehabilitación. El costo de la intervención es entre 2 y 3 veces menor, y el resultado técnico es superior porque se puede aislar toda la envolvente de forma continua desde el inicio.
Normativa y Certificaciones
Las normas de eficiencia energética en edificios se han endurecido progresivamente en toda la región. Conocerlas es indispensable tanto para cumplir con la ley como para poder acceder a certificaciones de sustentabilidad que agregan valor comercial a las propiedades.
Argentina: IRAM 11605
La norma IRAM 11605 establece los niveles mínimos de acondicionamiento térmico para edificios en Argentina. Define tres niveles (A: recomendable, B: medio, C: mínimo aceptable) y especifica los valores máximos de transmitancia U para muros, techos y pisos según la zona bioambiental. Las zonas bioambientales de Argentina van del I (muy cálido) al VI (muy frío), con exigencias crecientes hacia el sur.
Chile: NCh853
La Norma Chilena 853 regula las condiciones de habitabilidad térmica y establece los valores mínimos de transmitancia para distintas zonas del país. Chile, por su variedad climática (desde el desierto de Atacama al extremo sur patagónico), tiene una normativa más detallada que la mayoría de los países de la región.
Referencia internacional: ASHRAE 90.1
La norma ASHRAE 90.1 (Energy Standard for Buildings Except Low-Rise Residential Buildings) es la referencia técnica internacional más usada para diseño de envolvente eficiente. Aunque es una norma norteamericana, es ampliamente adoptada como referencia en proyectos de arquitectura sustentable en toda América Latina.
Certificaciones de sostenibilidad
LEED (Leadership in Energy and Environmental Design): la certificación verde más reconocida mundialmente. El aislamiento de la envolvente tiene peso directo en los créditos de energía (EA Credit: Optimize Energy Performance). EDGE (Excellence in Design for Greater Efficiencies): desarrollado por IFC/Banco Mundial, está diseñado específicamente para mercados emergentes. Requiere al menos 20% de mejora en eficiencia energética, hídrica y de materiales respecto a la línea base local.
Planificá tu proyecto de aislamiento con ArqPlano
Antes de presupuestar el aislamiento de tu vivienda, es fundamental conocer con exactitud las superficies de techo, muros y pisos que necesitás aislar. Un error de estimación del 10% puede significar comprar material de más o de menos, con costos y demoras significativas.
Con ArqPlano podés dibujar el plano de tu casa, definir la altura de los muros y obtener automáticamente las áreas de cada superficie de la envolvente. Así llegás al corralón o al presupuesto con números exactos, no estimaciones.